Гайд The Legend of Zelda: Breath of the Wild: поради та секрети - одяг, зброю, правоохоронці, святилища і скарби. Гайд The Legend of Zelda: Breath of the Wild: поради та секрети - одяг, зброю, правоохоронці, святилища і скарби В ооружітесь за останнім словом
A lot of of the story in The Legend of Zelda: Breath of the Wild is told via flashback. At the start of the game you wake up from a 100 year slumber, and Link has no memory of what happened 100 years ago. It "s down to you to help him recover those memories - and only if you choose to do so.
Early on in the story you "ll be directed to visit staple Zelda character Impa in Kakaiko Village. Eventually she" ll give you a new quest to track down your missing memories from 100 years ago. You do this through looking at some photos Impa has downloaded on to your Sheikah Slate. If you press Minus and hit R from the map you "ll be able to see the photos. Head to any of the locations pictured in these photos and you" ll see a shining golden portal. Step into it and press A and Link will suddenly have an epiphany and you "ll unlock a scene from 100 years ago.
There are 12 photos initially, and once you "ve unlocked all 12 Impa will reveal a 13th and final memory to you.
Unlocked memories are put into a list of "Recovered Memories" on the quest log. There are 18 total, with recovered memory 2, 4, 6 and 10 unlocked across the course of the storyline as you tackle each of the game "s Divine Beast dungeons. Recovered Memory 18 unlocks when Link finally pulls the Master Sword from its plinth- an act which is entirely optional. By completing all 18 memories you "ll have a complete picture of Breath of the Wild" s storyline.
Breath of the Wild: Where to find all the Missing Memories
Photo 1 (Memory 1) - Sacred Ground Ruins
The first photo on your Sheikah Slate in the top left corner of the photos page is easy to find but difficult to reach unless you "re careful. This memory is found right in front of Hyrule Castle Town. If you look on your map you" ll see Castle Town forms a sort of semi-circle around Hyrule Castle, and at the very middle of it a road leads out to a circular stone paved area. These are the sacred ground ruins, and this memory is here. Beware of Guardians when grabbing this memory, as they "re around this area and can one-shot you until the late game.

Photo 2 (Memory 3) - Lake Kolomo
The second of the photos on the Sheikah Slate (top row, second along) is found north of the Great Plateau where you start the game. If you teleport to the Oman Au Shrine on the edge of the Plateau and look straight north you "ll see a lake - this is Lake Kolomo, and the memory is overlooking Lake Kolomo towards the East, with the split-in-two mountain off in the far distance.

Photo 3 (Memory 5) - Ancient Columns
If you "ve seen our page on the Great Fairy Fountain of Tabantha you" ll know Piper Ridge well. If not, teleport to the Tabantha Tower at the top of Nero Hill and look straight South on your map. Before Tanagar Canyon you "ll find Rayne Highlands; on the far Eastern end of this mountain range is the Ancient Columns area and among it the Tena Ko" sah Shrine. This memory is pretty much exactly ourside this shrine.

Photo 4 (Memory 7) - Kara Kara Bazaar
The Kara Kara Bazaar is the setting for this fourth photo (top right) - and that "s located out in the Gerudo Desert in the far south east (bottom left) of the map. There" s only one path through to the desert, culminating in the Gerudo Canyon stable and the nearby Kay Noh Shrine. Follow the road out into the desert and you "ll find Kara Kara on the way - the memory is just near the road, overlooking the Bazaar.

Photo 5 (Memory 8) - Eldin Canyon
The fifth photo (middle left) is found on Eldin Canyon at the edge of Death Mountain, but it "s actually easier to approach from the west. Our advice is to start at the Woodland Tower, the tower just outside the Great Hyrule Woods and Lost Woods, and head East, climbing the mountains until you reach the approximate point. Use the view of the castle and the shape of it to determine the exact position. You "ll know when you" ve found it as there are some rocks in a ceremonial position in a flat area. Stay alert, as enemies hang out around here.

Photo 6 (Memory 9) - Irch Plain
For once this is a memory that isn "t entirely tinted with a sense of doom about it, but the scene in the photo is very different to the ruinous view of the castle we have now. Look in the north-western edges just beyond Hyrule Castle "s moat. Here, not far from the Monya Toma Shrine, is this memory - on Irch Plain, near a couple of smaller bodies of water.

Photo 7 (Memory 11) - West Necluda
This photo is pretty easy to identify thanks to its very iconic scenery - it "s overlooking the Bridge of Hylia, which of course is reminiscent to many of Twilight Princess. Look on your map at the northern mouth into Lake Hylia - here you" ll find Scout "s Hill. On the other side of the river from that larger hill is this memory, in the shadow of a tree.

Photo 8 (Memory 12) - Hyrule Castle
Well, this one is exciting! Hyrule Castle is technically the game "s final dungeon, of course, but you can go there any time. It has a dungeon style map as a result, but we" ve marked the exact position of this memory on the regular map so you can get your bearings. Avoid the guardians and climb or sneak your way to the left wing of the castle, where in one of the towers you "ll find Zelda" s room. On a bridge between Zelda "s room and another tower (Zelda" s study, it looks like) you "ll find this memory, the eighth (middle right) photo.

Photo 9 (Memory 13) - Spring of Power
The ninth photo downloaded for you (bottom left) depicts a shrine of sorts, and you can find this in Akkala, a little ways from where the story points you to the Akkala Ancient Tech Lab. You likely already discovered the East Akkala Stable and Katosa Aug Shrine, too - head West from those and look for a hole in the ground. There "s Ordorac Quarry sunk deep into the ground, and next to it is the Spring of Power, this memory" s location.

Photo 10 (Memory 14) - Sanidin Park Ruins
To the West of Central Hyrule "s Tower you" ll find Mount Daphnes (shout out to the King of Red Lions) - and to the west of that is Regencia River. On the other side of the River are the Nima Plains, and on the road leading through that plains is a park that has as structure that looks a little like a horseshoe (or an omega symbol). This is Sanidin Park. Grab this horse-themed memory here.

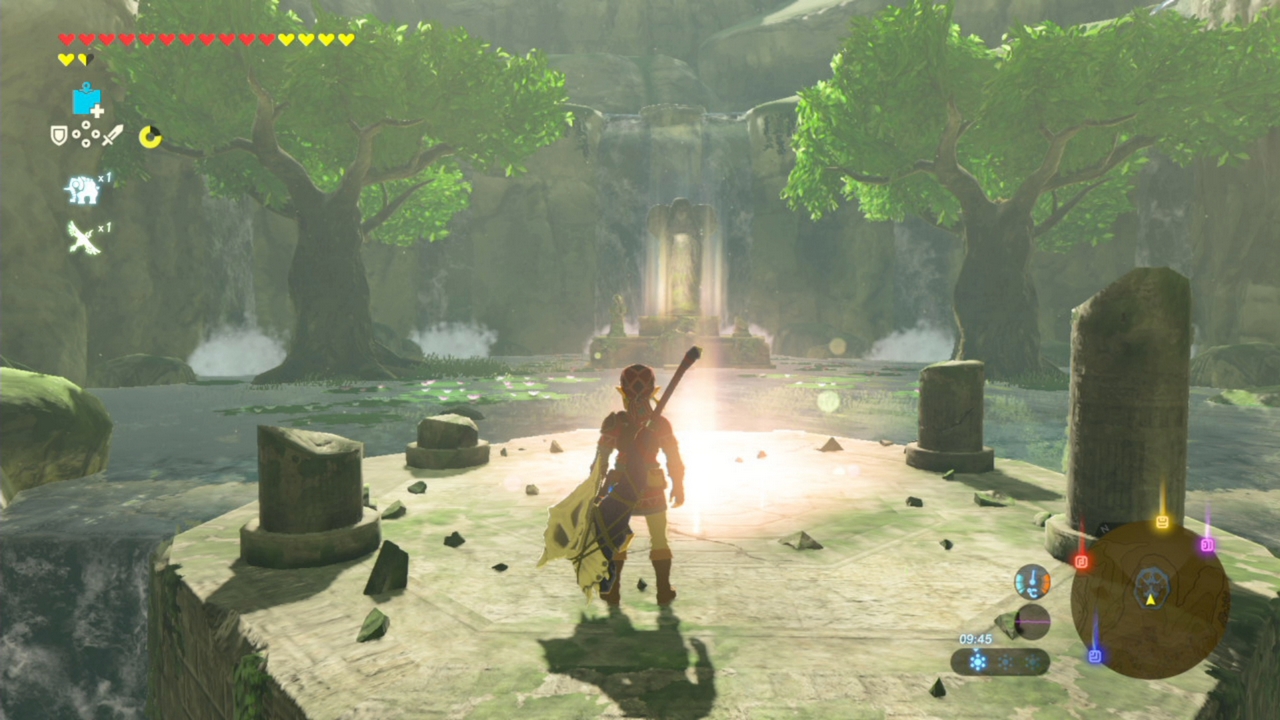
Photo 11 (Memory 15) - Lanayru Road East Gate
This memory is another easy one to find so long as you have a broad idea of where it is. In the far east of Hyrule slap bang in the middle of the map is Mount Lanayru. To the West of the mountain is one clear path that leads from near Kakariko right through to the mountain path. The path runs parallel to a body of water in the shape of a T. The memory is here, on the road, right near the foot of the mountain.

Photo 12 (Memory 16) - Hyrule Field
This one tripped us up for ages; look on the east side of Hyrule Field towards the vertical middle of the map for a place called Bottomless Swamp. Just above Bottomless Swamp is a small forest that runs along the Hylia River. Within this forest this final memory (bottom right in the photos page) is waiting for you.

The Final Picture (Memory 17) - Ash Swamp
Once you "ve returned to Impa with the 16 memories above, she" ll show you the picture for this final and vital memory. The memory is actually quite close to Kakariko, but is closest to the Duelling Peaks Stable and the Ha Dahamar Shrine. Just to the East of this shrine and ranch is Ash Swamp, and among the many defeated guardians sandwiched between the two bottom puddles this memory glows for the taking.
Якщо ви знайомі з серією The Legend of Zelda і грали хоча б до деяких минулі частини, то напевно побачите, коли проведете пару годин в Breath of the Wild, що вона набагато об'ємніше своїх попередників. Гра відтепер скидається радше на Skyrim, який, як відомо, уособлює собою жанр RPG-пісочниці.
Якщо ви будете орієнтуватися на досвід минулих ігор, то пропустіть багато захоплюючих історій і подій, які розкидані по світу Breath of the Wild. Саме тому ми склали цей гайд, щоб новачки могли перевести дух і ознайомитися зі вступним контентом, який вкрай не рекомендується пропускати.
не обмежує вас і не змушує йти по головній сюжетній лінії. Побачили гору на горизонті? Так вирушайте і відвідайте її!
Теплий одяг
На території Великого Плато ви можете наштовхнутися на аномально холодну місце, де неймовірно низька температура. Минути цю смугу перешкод можна за допомогою гарячої їжі, а також зілля, які збільшують опірність холоду. Але при бажанні ви можете вибрати і інший варіант - теплий дублет, який нітрохи не гірше зможе захистити вас від морозу.

Роздобути цей елемент гардеробу можна на Великому Плато. Ви можете знайти його на південному сході карти, всередині халупки, якою володіє селянин. У його щоденнику ви можете прочитати про якийсь рецепті, який може допомогти зігрітися, проте старий забув інгредієнти. Допоможіть йому, створивши їжу з пекучого перцю, м'яса і окуня з Хайрул.
Розкажіть селянинові про своє досягнення, і тоді він вручить вам дублет. Ще таку ж одяг можна знайти на горі Хайле, де вас знову зустріне цей же старий. Тепер він нагородить вас дублетом за завзятість, що ви зуміли забратися на таку висоту без нормальної одягу.
У тому випадку, якщо ви пройшли головну лінію в цій локації, то квести селянина пропадуть. Однак теплий дублет все одно чекатиме вас в хатині мужичка - він просто залишить його для вас.
Збір врожаю
Кожна травинка, їжа або шматок матерії, які можна роздобути в The Legend of Zelda: Breath of the Wild, застосовуються для будь-якої мети.
Помітивши блиск в поглибленні скелі або кроні дерева, обов'язково огляньте це місце, так як будь-яка світиться річ може стати в нагоді в майбутньому. Мало того, інгредієнти не займають місця в багажі, так що збирайте їх стільки, скільки душі завгодно.

Роздобувши м'яса, фруктів, приправ і іншої їжі, сміливо комбінуйте її у мангала, щоб з'ясувати рецепт ідеальних страв. Тим краще і дорожче рецепт, тим більше підсилень ви отримаєте, так що не нехтуйте цим!
У ооружітесь за останнім словом
На території Великого Плата знаходиться чимало хорошого зброї (хоча і марного теж навалом). Часто вам будуть зустрічатися різного роду палиці та дубини, які завдають хоча і слабкий шкоди, але все ж непогано справляються з місцевими противниками - натовпами Бокоблінов.
Абсолютно будь-яка зброя, окрім, ламається, так що в дорозі до цієї гарматі вам доведеться змінити безліч варіантів. Щоб завжди мати запасну зброю, оглядайте скрині і не бійтеся боротися з сильними супротивниками.
До слова, в уже знайомій вам халупі селянина ви знайдете сокиру, який цілком згодиться на старті гри. А ще на Плато ви можете швидко роздобути молот, який знаходиться в Святилище на горі.

Найкраще зброю видобувається з босів і святилищ. Але це не означає, що вам не потрібно оглядати інші містечка на кшталт сіл або стаєнь в пошуках гармат.
В останніх ви можете розшукати слабкі варіанти, які варто застосовувати проти безпечних супротивників. Витрачати сильна зброя на натовпи низькорівневих ворогів - моветон.
Р азисківайте кірок
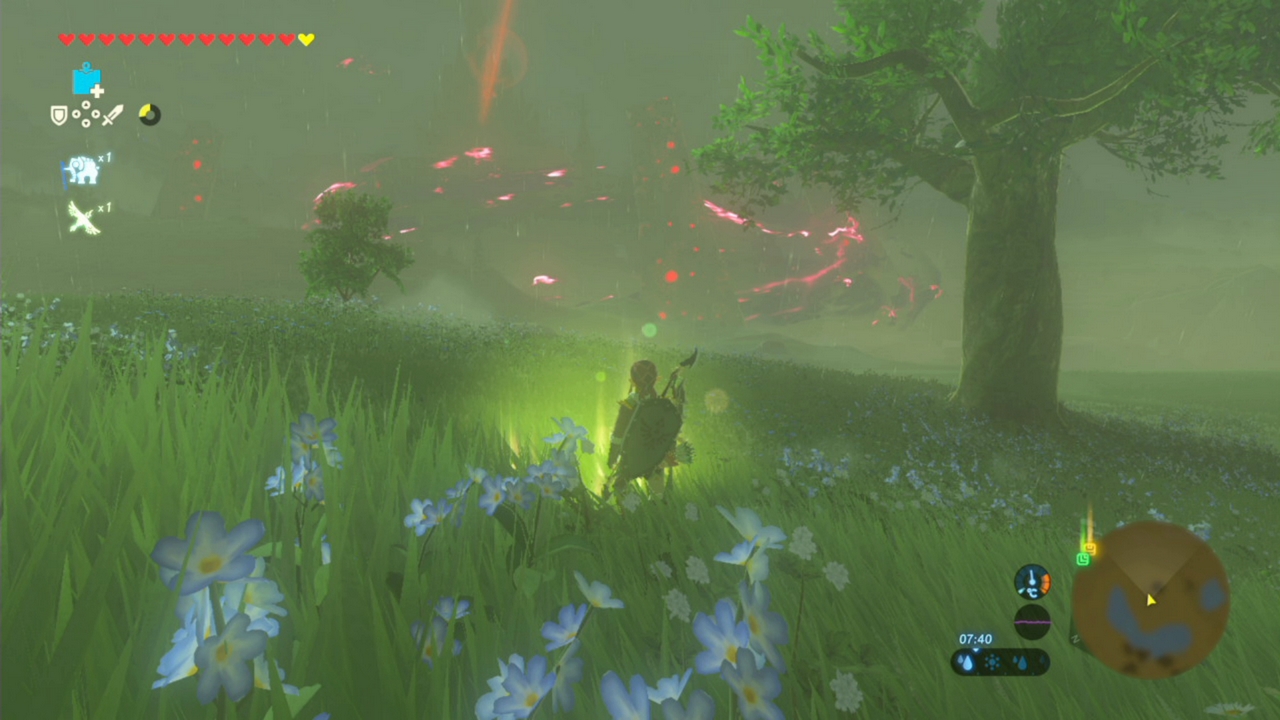
У своїх мандрах по світу The Legend of Zelda: Breath of the Wild ви будете часто натикатися на загадкові місця. Такі собі аномалії, представлені одиноким каменем в чистому полі, кільцем лілій на ставку і так далі.

Опинившись в подібному місці, будьте впевнені, що десь неподалік розташувалися кірок. Якщо ви виявите таке створення, то отримаєте від нього насіннячко кірок - найціннішу валюту, яка не раз стане в нагоді вам протягом проходження.
Про Скажіть допомогу Есту
В дорозі до села Какаріко ви натрапите на одного з представників племені кірок, якого звуть Есту. Саме він може дати перше насіннячко, але для початку вам належить допомогти йому.

Виконайте його місію, щоб отримати можливість звертатися до нього в майбутньому за поліпшеннями. Віддавайте Есту насіння кірок, щоб підвищувати кількість слотів в інвентарі для будь-яких видів зброї.
З аарканіть свого коня
Хайрул є гігантською країною, яка розрахована на десятки годин дослідження. На своїх двох ви натурально годинами будете перетинати величезні дикі простору, що з часом набридне. Щоб не допустити цього, роздобудьте собі коня.
В The Legend of Zelda: Breath of the Wild ви можете відшукати дику кобилу і приручити її. Зазвичай вони живуть зверху і праворуч від Великого Плато, або в чистому полі біля «Близнюків».
Для приручення коня вам знадобиться неабияка спритність. Спочатку ви повинні сісти, щоб видавати якомога менше звуків. Потім крадьтеся до кобили, поки не опинитеся до неї майже впритул. Тоді відразу ж стрибайте на неї і швидко натискайте на кнопку «втихомирити». Чим крутіше у коня характер, тим важче вам доведеться.

Після цього ви повинні надати своєму «викрадення» законний статус. Відправляйтеся в стайню, де можна зареєструвати свій новий транспорт і дати йому кличку. Справу зроблено.
Однак на цьому механіка взаємодії з конем не закінчується. Звертаємо увагу, що між вами є шкала довіри, зростання якої буде підвищувати до вас прихильність конячки. Щоб нарощувати шкалу, просто хваліть кобилку при кожному зручному випадку.
І щиті вежі і активуйте їх
У своїх мандрах по Хайрул вам нерідко доведеться натикатися на Вежі Відродження, які розміщені абсолютно в кожній області в єдиному екземплярі. Забравшись на вершину цієї споруди, ви зможете активувати його, щоб відкрити карту даної області.

У підсумку на вашій карті з'явиться місце розташування найближчих стаєнь, святилищ і інших корисних місць. Однак абсолютно всі цікаві точки і місця подій не відчиняться - тут в будь-якому випадку доведеться діяти вручну.
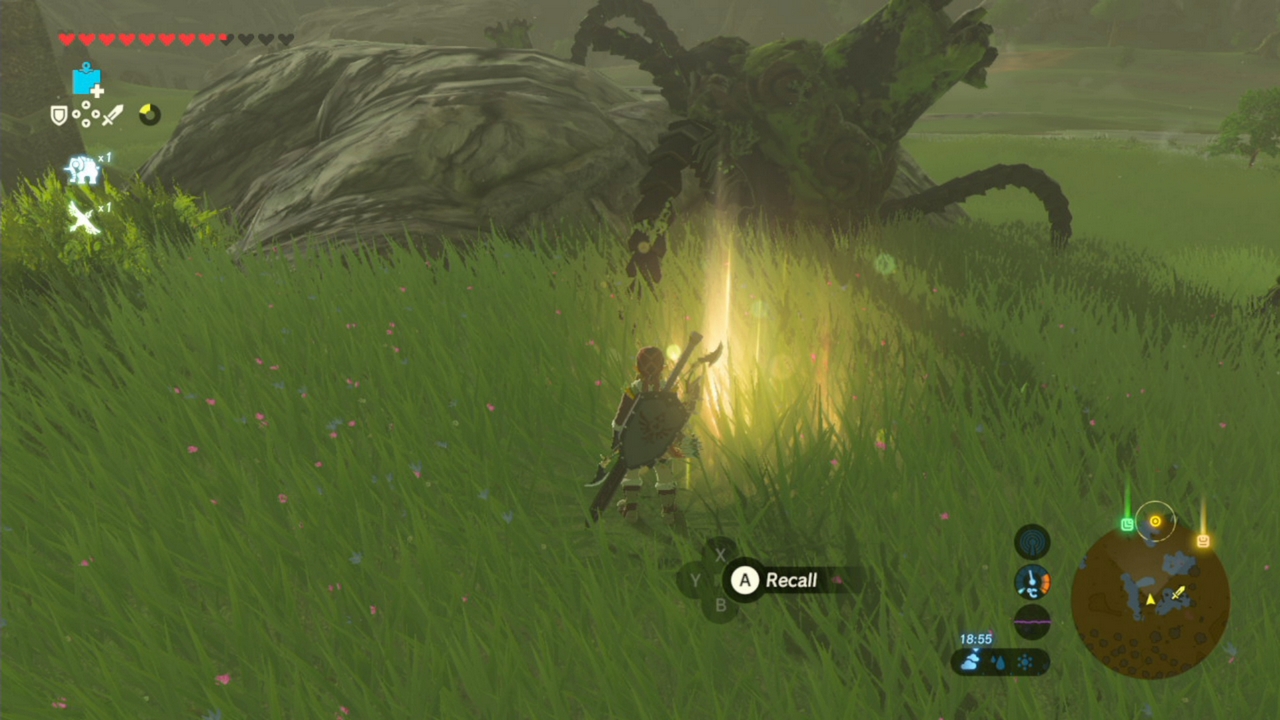
Про розглядати повалених вартою
По периметру Великого Плато часом зустрічаються шматки забутих Стражников. Колись вони, величні, охороняли ці області, але тепер нагадують про себе лише іржавими уламками.

Дослідивши подібні руїни, ви точно роздобуде що-небудь корисне. При будь-яких розкладах вам завжди будуть потрапляти стародавні уламки, які можна продавати за непогану ціну. Вони також можуть знадобитися вам в кінці гри в справі крафта або другорядних завданнях.
І дотримуйтесь Святилища
В The Legend of Zelda: Breath of the Wild відсутні підвищують ваше HP сердечка, як було в минулих іграх серії. Відтепер збільшувати здоров'я доведеться іншим чином - проходячи Святилища. У них ви будете знаходити статуї Богині, яким потрібно буде молитися.

За успішне проходження святого місця ви будете отримувати чотири ментальні сфери, які можна обміняти на підвищення здоров'я або підвищення витривалості.
Відповідно, для битви з особливо сильними супротивниками вам варто збільшувати HP. А якщо ж ви виявили, що не можете залізти на певну гору, то має сенс пройти чергове Святилище, а потім вкласти окуляри в Стаміни.
П латок Скелелаза
Одяг дає не тільки стійкість до морозу. Праворуч від Великого Плато, минувши «Близнюки», ви виявите святе місце Рі-Дахи. Там лежить ящик, в якому ви знайдете «Хустина Скелелаза».

Цей предмет неймовірно корисний в справі альпінізму - він буде прискорювати ваші рухи під час підйому. Дістанете цю річ як можна швидше, так як вам доведеться дуже часто лазити по горах.
Р азищіте велику фею
Під час подорожей ви будете зустрічати великих і маленьких фей. Звичайні будуть давати вам невеликі бонуси, якщо вам вдасться виловити їх біля ставка. Великі ж феї пропонують свою допомогу тільки за рупії.

Отримати від товстих фей можна тільки одну дію - поліпшення речей. Кожна фея може модернізувати ваш наряд лише один раз, але зате значно.

Саме тому вам варто відшукати їх усіх. До слова, перший джерело з феєю ви виявите на височини неподалік від села Какаріко.
Н е нехтуйте скарбами
Світ The Legend of Zelda: Breath of the Wild тріщить по швах від кількості різноманітних скарбів. Знаходити їх можна практично скрізь, але лежать вони завжди в одному і тому ж місці - всередині скрині.
Під час пригод озирайтеся і досліджуйте кожен куточок, так як цінні скриньки найчастіше заховані саме в таких, прихованих і непоказних місцях. Завали, дно річки, надра руїн - скарби оточують вас, але відкриються лише самим проникливим!

Як ви вже зрозуміли, світ The Legend of Zelda: Breath of the Wild сповнений таємниць і пригод. Якщо ви допитливі, любите подорожувати і досліджувати, то ця гра гарантовано сподобається вам.
Відео: як запустити The Legend of Zelda Breath of the Wild на ПК

Знайшли помилку?
Повідомте нам, виділивши фрагмент мишкою і натисніть CTRL + ENTER. СПАСИБІ!
Breath of the Wild is the first voice-acted Zelda game, but its story is delivered almost entirely through flashback - and you need to unlock each memory. Here's where to find all of the Recovered Memories to learn the truth of 100 years ago.
Once you visit Impa in Kakariko Village and have all of the basic runes of your Sheikah Slate restored, she offers you a task and triggers a new main quest: you'll need to locate places you visited in the past in order to reawaken memories of 100 years ago. This is how much of Breath of the Wild's story is delivered, through lovely context-filled flashbacks. They're well worth viewing, though getting access to them can be a little bit frustrating depending on how much you like easter egg hunts.
The Legend of Zelda: Breath of the Wild: Locked Memories Quest - where to find all the recovered memories
Impa will unlock 12 photos in your Sheikah Slate, and each points to a different part of the world. When visited each will trigger the awakening of a major event from 100 years prior for Link, offering important information.
There are 18 recovered memories total. Twelve are found through the Sheikah Slate, one is revealed to you when the other 12 have been found, and the others are given via story events. Here's how to get them all.
Recovered Memories # 2, # 4, # 6, # 10 and # 18
As an important note, the second, fourth, sixth, tenth and eighteenth recovered memories will be awarded to you over the course of the game's main story - so do not worry about these. The eighteenth and last in particular is optional and will be revealed generally very late on (though as always with Breath of the Wild, it depends how you play) - it triggers if and when you pick up. They're not part of this main quest.
Subdued Ceremony / Photo 1 - Recovered Memory # 1


This memory is the first photo on your Sheikah Slate and is is pretty easy to find - if you look on the map, there's a circular sort of place right in front of Hyrule Castle. This is the Sacred Ground Ruins. Head there and you'll find this memory - it's an interesting one, since it introduces you to some very key characters. There are a number of guardians around this area, so be careful when you go to grab this one, especially if you do it early on.
Recovered Memory # 3 / Photo 2 - Resolve and Grief


This memory is the second photo on the Sheikah Slate. It's found just north of the plateau where you started the game. Look on the map for the area in Central Hyrule marked Hyrule Field. Zoom in - you'll find the Exchange Ruins, Aquame Lake, the Forest of Time and the Gatepost Town Ruins. The nearest landmarks are the Oman Au Shrine and the Great Plateau Tower - Lake Kolomo is slightly north from both of these. The memory overlooks Lake Kolomo, looking towards the Dueling Peaks - the route to Karariko.
Subscribe to the VG247 newsletter Get all the best bits of VG247 delivered to your inbox every Friday!
Enable JavaScript to sign up to our newsletter
Recovered Memory # 5 / Photo 3 - Zelda's Resentment
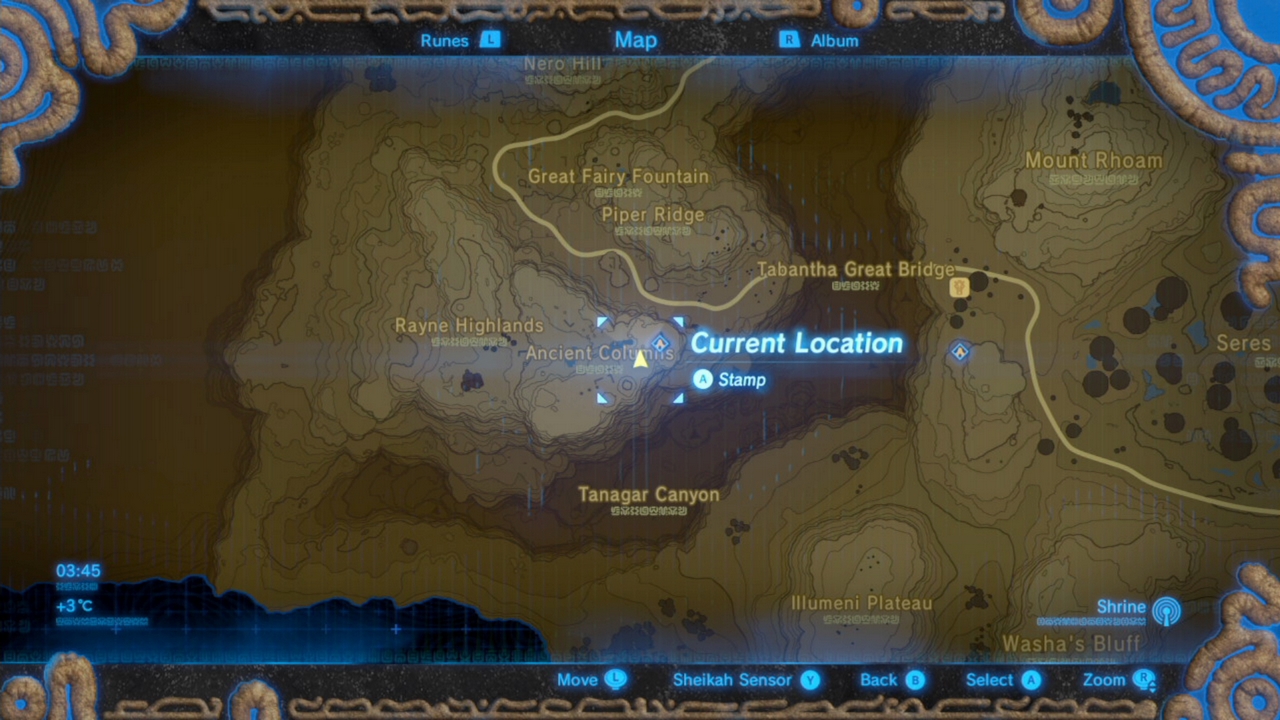

This is the 3rd photo in the Sheikah Slate. You'll find this memory in the Tabantha area of the map. Just to the south of Piper Ridge (which is to the West of Tabantha Great Bridge), you'll find an area called Ancient Columns. There's a Shrine here - the challenging Tena Ko'sah Shrine. The memory spot is right in front of said shrine.
Recovered Memory # 7 / Photo 4 - Blades of the Yiga
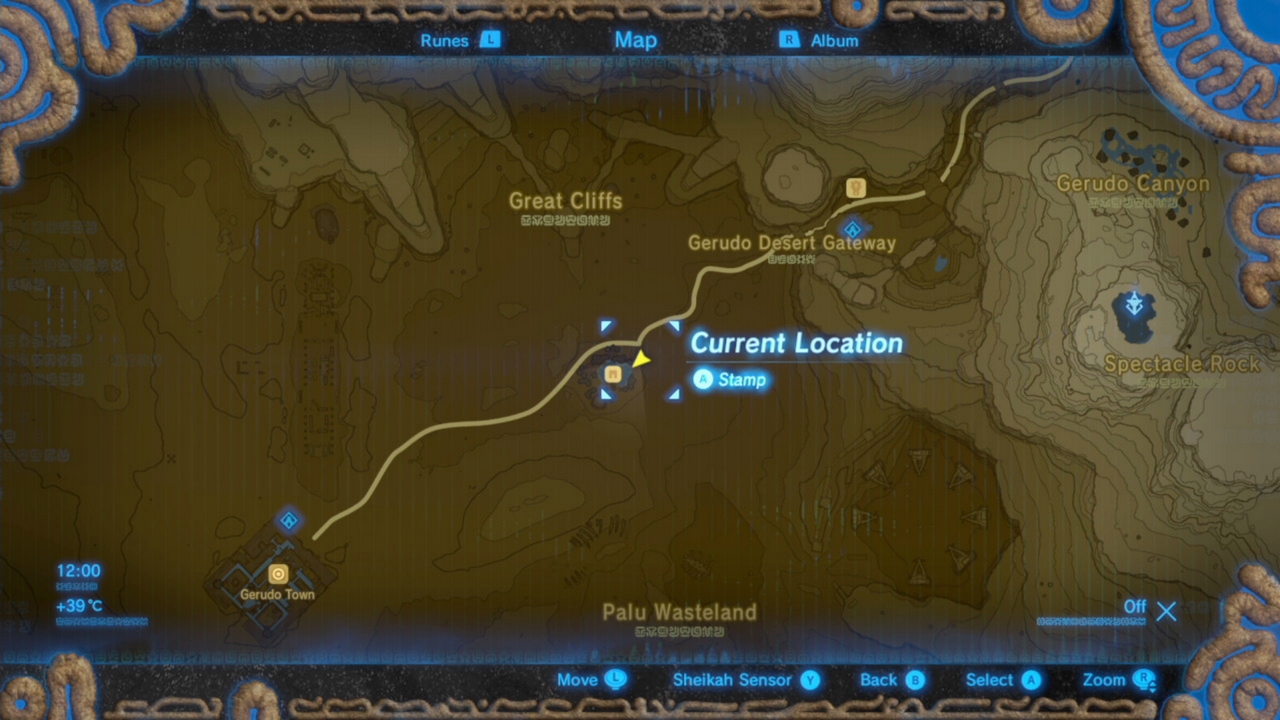

This memory is associated with the 4th photo in the Sheikah Slate. It's found at the Kara Kara Bazaar. Look at the Gerudo Desert on the map and then find Gerudo Town and Gerudo Desert Gateway. The Bazaar is at the halfway point between the two, and is difficult to miss. The memory trigger can sometimes be hard to see in the bright desert heat, but it's on the right side of the Bazaar when you look from the main shop.
Recovered Memory # 8 / Photo 5 - A Premonition


This memory is the 5th on the Sheikah Slate and is found in the Eldin Canyon area, the area on the outskirts of Death Mountain. The closest recognisable landmarks are the Woodland Tower and Minshi Woods - this is to the east of those. It's also to the north and slightly to the east of Pico Pond and the Mirro Shaz Shrine. It's up on the hills overlooking Hyrule Castle.
Recovered Memory # 9 / Photo 6 - Silent Princess

This memory is the 6th image on the Sheikah Slate and is found just north of Central Hyrule and Hyrule Castle, between Hyrule Ridge and the Great Hyrule Forest. The nearest landmarks are the Monya Toma Shrine and the Serenne Stable. Head a little south east from these; there are two small pools that are (if you zoom in) near Irch Plain.
Recovered Memory # 11 - Shelter from the Storm / Photo 7


This memory overlooks Lake Hylia's enormous bridge, but is a little distance away. It's the 7th memory on the Sheikah Slate. It's found on a hill that's sandwiched between Scout's Hill and Deya Lake. These hills are marked on the map as the Hills of Baumer. If you look for Scout's Hill on the map, it's just the other side of the Hylia river.
Recovered Memory # 12 / Photo 8 - Father and Daughter

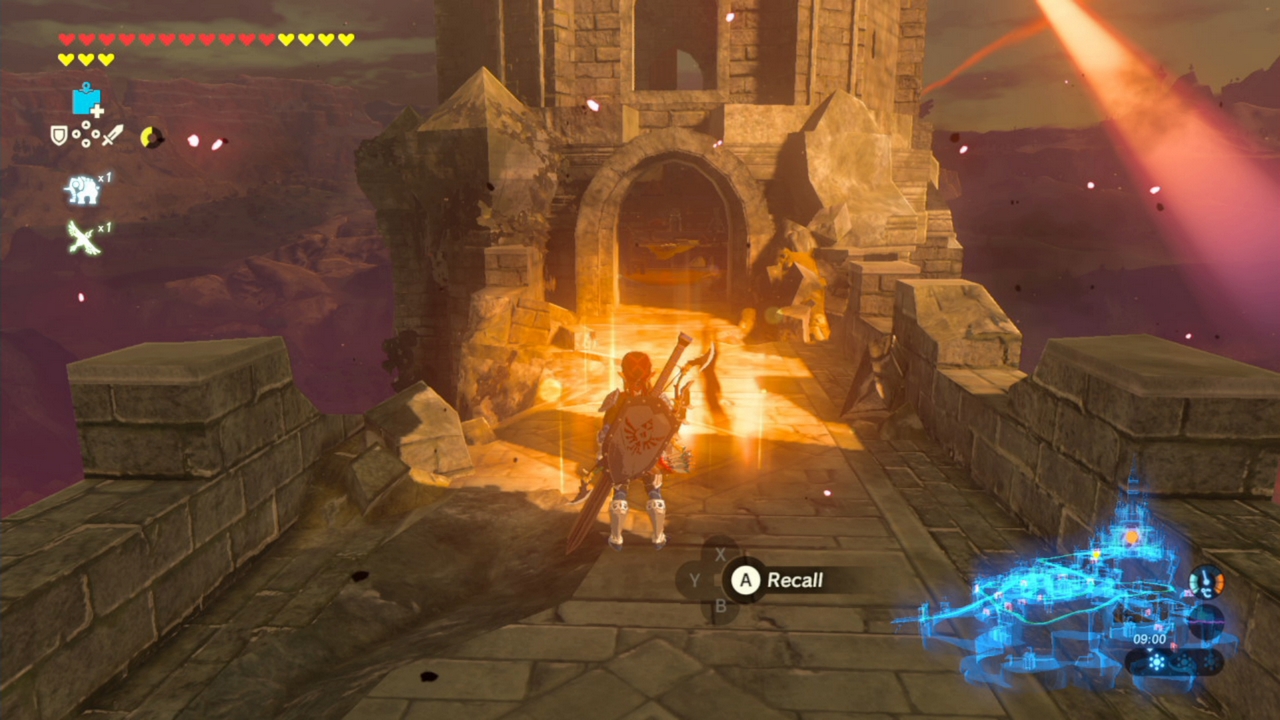
This memory is a risky one to get - it's in Hyrule Castle, AKA the final dungeon of the game, of sorts. The thing is, you can explore Hyrule Castle any time without consequence so long as you do not go to Ganon's lair, though you do so at your own risk as deadly enemies are all over. There are multiple ways in, such as via swimming up waterfalls, going to the docks or gliding in from afar to avoid the attention of guardians or simply stocking up on health items and making a full-on assault. The castle itself is threatening and oppressive but also absolutely surviveable for a brief visit from early on.
Once inside, this memory is found on the Western side of the castle, high up. As far as I can tell you'll need to head outside and do at least a bit of dodging guardians. In a Western Keep sort of area look for a room you'll notice is Zelda's quarters - there's a diary written by her in here. Climb the wall to the second floor here and you'll notice a small walkway - the memory takes place here. Consult our images, as finding the exact room can be a challenge.
Recovered Memory # 13 / Photo 9 - Slumbering Power

This memory is found in the Akkala Region. It's the 9th photo on the Sheikah Slate. Find the North Akkala Foothill - there you'll be able to see the East Akkala Stable and Katosa Aug Shrine. Head directly West from there towards North Akkala Valley and Ordorac Quarry. Nestled between these two is the Spring of Power, and this is where the memory is recovered.
Recovered Memory 14 / Photo 10 - To Mount Lanaru


You'll be able to find this memory, the 10th photo on the Sheikah Slate, up in the Safula Hill area to the west of Central Hyrule and east of Satori Mountain. Among this area is the Sanidin Park Ruins - once you get onto these high mountains look out for the ruins with a huge horse statue - this is where this memory is found.
Recovered Memory # 15 / Photo 11 - Return of Calamity Ganon
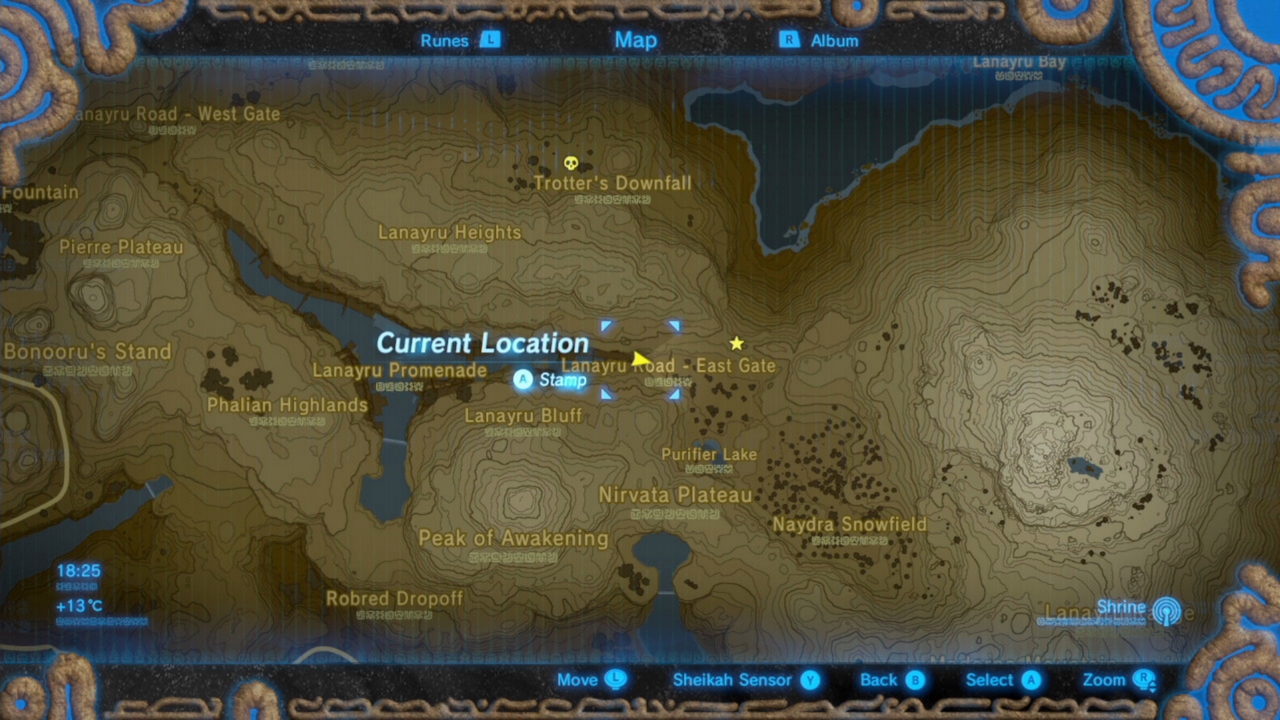

This memory is the 11th on the page of memory photos in your Sheikah Slate. It's found in the shadow of Lanayru. To the West of the mountain you'll find Naydra Snowfield - this is actually really very useful, and the snowfield leads past Purifier Lake into Lanayru Promenade. It's between these points at Lanayru Road - East Gate that you'll find this memory to recover. Things got pretty bad, huh.
Recovered Memory # 16 / Photo 12 - Despair


This memory is the final one, the 12th on the Sheikah Slate pictures. It's located just to the North-East of the Bottomless Swamp on the east side of Hyrule Field. If you look for some text on the map that says 'Hylia River' in between the Bottomless Swamp and the Kaya Wan Shrine and Wetland Stable, this memory is discovered right by this text in a small forested area.
Recovered Memory # 17 - Zelda's Awakening

The final memory that is not recovered naturally through story progression, this one is not backed up by a photo. After recovering all of the other 12 memories in the Sheikah Slate photos, return to Impa. She will reveal this final memory location to you ... and it's been under your nose since she first gave you back these memories.
Once she's shown you the image, head south from Kakariko, back over the bridge towards the Dueling Peaks Stable and Ha Dahamar Shrine. To the east of this is Fort Hateno, and between the two is the Ash Swamp area. The final memory is found in this location, the place where things came to a head 100 years ago.